Knitty Gritty Pattern: Karen Baumer’s Sweet Sweater

Materials
Dale of Norway “Heilo” yarn (100% new wool, 110 yards/50grams):
1 ball Sage (#9335)
1 ball Cream (#0020)
two sets of double-pointed knitting needles – U.S. size 2.5 (2.75 mm) and 3 (3.25 mm) or sizes needed to obtain gauge
stitch markers
tapestry needle
sharp scissors
steam iron
sewing machine
Gauge
Body
With size 2.5 dpns and Sage yarn (#9335), cast on 80 sts.
Work St st in the round (knit every rd) for 5 rds.
Purl one rd to create a folding edge.
Switch to size 3 dpns and work one rd plain.
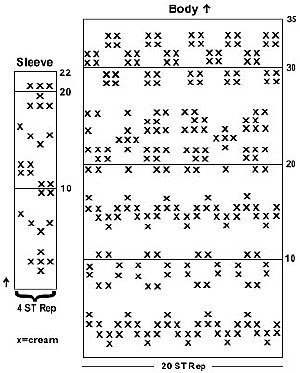
Work 35 rds of body chart (figures A and B) using the Fair Isle method of your choice.
Purl one rd.
Cast off knitwise, placing a marker at the start of the rd and another marker after 40 sts to indicate side seams.
Sleeves (make 2)
With size 2.5 dpns and Sage (#9335) yarn, cast on 44 sts.
Work St st in the round (knit every rd) for 5 rds.
Purl one rd (this will create a folding edge).
Switch to size 3 dpns and work 22 rds of sleeve chart using the Fair Isle method of your choice.
Purl 5 rds for sleeve top facing.
Cast off purlwise.
Finishing
Turn body and sleeves inside out; Weave in ends.
If you have tails of Sage yarn at the beginning or end of the pieces, leave them loose; You can use them later to sew the sweater together.
Steam pieces lightly from the inside, applying delicate pressure only and being careful not to move the iron around (to prevent felting).If you have a sleeve-pressing board, this is an excellent time to use it. Be sure to steam the bottom (plain green) edges flat, but try not to flatten the purled folding rows.
Turn pieces right side out. Place one sleeve alongside the side edge of the body where one of the stitch markers has been placed. Position it so the open top edge of the sleeve is perpendicular to the body, just as it will be once it is sewn in. Mark sleeve depth with a pin or a stitch marker. Repeat on the other side with second sleeve.
Set sewing machine to straight stitches, about 12 per inch.
Mark the column of stitches on the body that runs straight down from the marker at the top edge to the point where you marked the sleeve depth. In the column of stitches just next to that center column, use the sewing machine to stitch down the center of that column to the marked point.
Pivot and stitch across the middle column and to the center of the column of stitches on the other side of the middle column. Pivot again and stitch back up to the top edge through the center of that column.
Stitch once more over your existing stitches.
Repeat on other side for second sleeve opening.
Use scissors to cut open the fabric within the machine-stitched boundaries you’ve created, fashioning front and black flaps.
Sew shoulder seams by abutting the top, cast-off edges together, right side up, so the purl bumps are showing. Each row of purl bumps is staggered, with one bump closer to the cast-off edge alternating with one bump slightly further from the cast-off edge. You will be working only with the bumps closest to the cast-off edge.
With Sage yarn and tapestry needle, starting at armhole (cut) edge, sew shoulder seam for approximately 1″ by inserting needle into the first purl bump and across the seam itself through the corresponding purl bump on the other side, so your needle is crossing over the cast-off edge as you do so.
Bring needle back over the top of the seam and repeat the same sewing motion through the next set of purl bumps, going in the same direction. Remember, you are skipping the “outermost” bumps and only sewing through the sets of “innermost” bumps. It may help to visualize this as whip-stitching the seam together through the purl bumps.
With right sides out on all pieces, insert a sleeve into sleeve opening so that the first purl row of the upper sleeve facing is visible but the remaining part of the facing is stuffed inside the sleeve opening. You will be using only that first row of purl stitches as you sew in the sleeve. Anchor the sleeve in place with safety pins (3 or 4 should be enough).
When both sleeves are sewn in, turn garment inside out and lightly sew down the sleeve top facings over the raw edges that were created when you cut open the knitted fabric. Fold up the bottom facings of the body and sleeves along the purl rds and sew lightly in place.


 Alert: The Ginger Spice Bi-Color Brioche Scarf! We couldn't resist whipping up this beauty out of the YarnYAY! October featured yarn @thefibrecompany &Make Aran (in colors Spill the Tea and Mon Ami). Make it to match either pair of the mitt patterns that come with our October Box, or make it on its own. You do you!
Very cute bear and great pattern. Thanks for the detailed instructions.
So sweet – I love the color. TFS
Thanks for the pattern. Your show just got better and better. Sorry to see crafts disappear from that network.
Today I could not find the Knitty Gritty patterns on DIY’s website. Is there any place to get them?
Thanks for a great show.
I have been looking high & low for this pattern! I had lost my copy. Thank you SO much for posting this.