I Love to Create: Grease Lightening Fabric Dyeing!
 Customized, hand-dyed fabric can be affordable and easy to make. This week on I Love to Create I say, “Pffft to pre-designed fabrics!” showing you how to make personalized prints using supplies from you local craft store. Live fast and dye young, people!
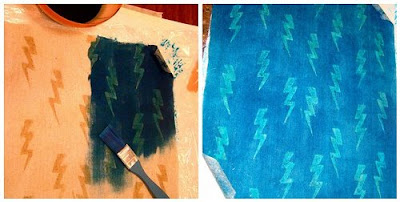
- Lay fabric out on a protective mat or newspaper. Place sticky stencils on fabric in desired pattern.
- Dab Cool Color block into stencil cut-outs (In case you’re wondering why a couple of the stencils are orange, it’s because I’m re-using a couple of the stencils from the bib painting party).
- Remove stencils and re-place them where you want the pattern to repeat. Dab on color block. Repeat process until fabric is covered with design to your liking.
- Let set for 30 minutes.
- Mix One-Step Fabric Dye, according to manufacturer directions. Pour into a bowl.
- Using a paint brush, apply color to the entire piece of fabric including, over the stenciled design.
- Once you’re satisfied with the coverage, cover piece with plastic wrap and let sit for at least 4 hours.
- Throw fabric piece into the washing machine (or hand wash) on gentle, with a small amount of soap.
- Hang to dry.
- Use your new, customized fabric to make a totally unique project with! Here are a few ideas:
- Cover a journal or photo album
- Decoupage over an old frame
- Sew a small zippy bag for crafty tools
- Make into a rockin’ baby bib
- Cut into appliques to add onto a skirt, shirt or tote bag


Oh, I love Amy Butler’s book! I can’t wait to see what you’ll make with the new fabric. 🙂