
I Love to Create: Customizing Yarn with T-shirt Dye!
 Ever wonder if those cold-dyes in the fabric paint aisle of the craft store, would also work for dyeing yarn? Well I did. Turns out that curiosity does not kill the craft! For relatively little time and money you can have your own custom made yarn without having to hunt down fancy, chemical dyes or invest the hours required for natural dyes. Here’s the scoop…
What You’ll Need:


- Tulip’s One-Step Fashion Dye in desired color. I went with 3 different colors for 3 separate hanks of yarn: Yellow, Black & Red.
- Small amount (about 50 yds) of white, natural fiber yarn (wool, cotton, hemp, etc). Note: Synthetic yarns will not take this dye, so make sure you know what you’re working with before you start the dye process!
- Plastic wrap or bags (This is a great time to use one of those zip-closed bags you might have recycled!)
- Newspaper or protective mat.
What to Do:

- Prep area by spreading out newspaper or mat to protect your work space.
- Following the directions from the box, add water to to dye mix bottle. I wanted more saturated color, so I added less water (about 2/3 full) than called for. Play around with water-to-dye ratios, for different shades of color.
- Apply dye to yarn with squeeze bottle.
- You’ll notice that the dye will bead up upon contact with the yarn, so use your fingers to mush the color into the fiber. Make sure to not agitate the yarn too much though because even though you’re using cold water, you may see some felting with too much rubbing.
- For the Yellow & Black hanks, I saturated the yarn as much as possible with 1 bottle of dye while also embracing the imperfections of hand-dyeing. Don’t be afraid of having a little white poke through, it adds character!

I call this one, “Dexter”.
- For the red batch I didn’t worry about dyeing evenly at all, instead opting for a splatter effect.
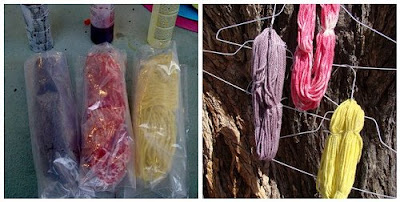
- Once you’re satisfied with the color coverage, wrap wet yarn in plastic wrap or baggie. Let sit for at least 4 hours.
- Rinse color out, using cool water and mild soap (gentle shampoo works great!) Squeeze out excess water, again being careful not to agitate.
- Let hang dry.
What You Get:

From the colors I chose, I expected more punk rock than pastel–but hey, Easter’s coming up, right? You never know how each yarn is going to interact with the dye, so go into your yarn-speriment with an open mind. It’s liberating, I promise.
Here’s what the 3 balls look like, knitted up.

- Swatch #1: the yellow, turned out pretty close to perfect as far as color-matching goes. This lovely, lemon yellow is perfect for Spring!
- Swatch #2: the black, had a mind of it’s own and turned out less goth, more grape. Still nice, though!
- Swatch #3: my fave, the red, came out a variegated pink and white. This one reminds me of taffy and would be adorable made up into a little girls’ jacket!
Something Different:

If you really want to go crazy, try working with one of the Tulip One-Step Tie-Dye Kits. The above ball of yarn was dyed with the “Moody Blues” pack. This technique just requires tying off segments of yarn for each of the 3 colors, letting them blend at the ties. You’ll notice that the colors of this one are a wee bit more muted than their single-colored sisters. This is what results from filling the applicator bottle completely, with water. The bonus of going the muted, tri-color route is definitely mileage. I was able to dye over 200 yds of yarn with one kit–that’s enough for a skinny scarf, a kids’ beanie, or a baby garment!

Although this colorway isn’t necessarily my gig, I do love the nostalgic feel that it has–reminds me of the yarn my mom used to knit garments with for my dolls when I was a kid.
Hope the rest of your week is to dye for (har, har, har.)
Have fun and dye on!
xo,
Vickie


Thanks for this. I think I’ll try for more bright punk-rock colors as well. Great tips.
This is great! Now I know I don’t need to buy expensive dye to practice or play around with color! Thanks!
That is way to cool. Hmm a Michael’s trip maybe….
Cora
Wohoo! Love them all, but the tie-dye is callin’!
I love the purpley one. Thanks for sharing!
Oh, thank you for showing us this technique, Vicky! I have always wondered if you could use these dyes for yarn. Now we all know!
Dexter! That’s hilarious. This is good to know; I’ve done some Kool-Aid dyeing, but it’s great to have an option that works with cotton as well.
i love the tie-dyed skein the best. i haven’t dyed yarn for a long time, but this brand would be neat to try.
Here’s what I want to know: does the dye stink? Is it fume-y? I love dyeing with Kool-Aid but you have to use vinegar to set it and it is stinko. thanks, I love that you’re so adventurous. 🙂 Carrie
i like the purple one. it would go great with a black along with it. 🙂