
I Love to Create: Sweetheart Silhouettes Free Project!
 Valentine’s Day is just a few days away but with the current state of the economy, buying your sweetie that cherry red Les Paul guitar, may not be all that realistic. No, during financially trying times like these, it’s time to embrace the handmade and get creative! Enter my new, weekly blog column focused on making fun, meaningful, eco-mindful creations, without breaking the bank. That said, welcome to my very first post for ilovetocreate.com, a new online source for projects, education, community and inspiration–brought to you by the fine folks responsible for craft supply staples like: Tulip paints and glitters, Aleene’s glues and of course, the Crafty Chica line!
Without further ado, let’s get started on a great V-day giftie that you can make with only a few dollars worth of supplies and a bunch of stuff you may already have laying around the house!

Step 1: Gather Supplies

1 bottle Tulip Soft Fabric Paint in Black (This type of paint will ensure that your pillow won’t be plagued by paint crunchiness.)
2 1/2 yds. Ball Fringe (optional)
2, 8″x10″ Pieces of Repurposable Fabric (I used vintage bark cloth, but thrifted skirts, old curtains or unwanted tote bags will also work. Remember, we’re trying to use what we have, so don’t feel like you have to go out and purchase fancy, new home decor fabric!)
Filing Folder (Instead of trashing used ones, recycle ’em into custom stencils!)
Sewing Machine (Optional, if you’re patient with hand-sewing.)
Sewing Pins & Needle
Coordinating Thread
Bamboo or Cotton Stuffing
Scissors
Newspaper or Wax Paper
Masking Tape
Pencil
Black Marker
Craft Knife
Sponge Brush
Fine Tip Brush
Camera (I like working with Polaroids for nostalgia’s sake, but any camera would work.)
Scanner and/or Printer
Step 2: Get the Picture
- Snap a shot of your mate, mug shot/profile style. Trust me, it’s romantic. For best results, shoot against a plain(ish) wall and from the bust up. Have someone take the same shot of you.
Step 3: Make the Stencil

- If you’re keepin’ it old skool like me, then take a marker, outline and fill-in each person’s profile directly on the photographs.
- Using a scanner/printer (or just a plain ol’ copy machine), resize image to 200% (this number will vary if you’re not using Polaroid or are choosing to make a different sized pillow–experiment, if necessary) and print out on regular paper.
- If you choose to get all techy with it, you can do all of the above in Photoshop and then print out the result.

Step 4: Paint the Profiles

- Lay down a large piece of waxed paper or a stack of newspaper to protect your table.
- Lay fabric down and place stencil centered on top of it.
- Tape stencil down to table, so it won’t move while you’re painting.
- Working from the outside in of the stencil, use a sponge brush to dab the paint onto the fabric. You’ll need to use your finger to hold down the stencil edges while you’re working around the edges. Let partially dry.
- Carefully remove stencil.
- While the paint is drying, check back to see if touch-ups are necessary where fabric might still be showing through.
- Use a fine tip brush to clean up the lines, if necessary. Let dry completely.
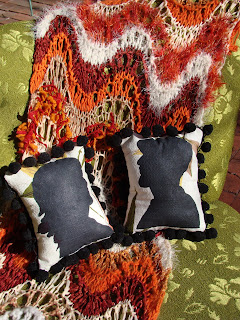
Step 5: Make the Pillow

- Pin bobble fringe onto the RIGHT SIDE of the pillow back, making sure the fringe is facing in (see above picture).
- Using a 1/8″ seam allowance, baste fringe onto fabric. Alternatively, you could skip this step and use Aleene’s Fabric Fusion to glue fringe onto just the front piece of the project once you’re finished sewing the pillow together.
- With RIGHT SIDES facing, bobble fringe tucked in and a 1/4″ seam allowance, sew front and back pillow pieces together. Make sure to leave about a 3″ opening for turning.
- Turn pillow right side out and stuff firmly.
- Fold opening edges inward and hand-sew closed.
Voila, you’re done! Now you and your honey can spend the whole day on the couch, staring longingly at each other. Well, at least your personified pillows can!
Post on this blog, what ways you’re getting creative this Valentine’s Day and be entered to win a pack of Tulip Soft Paints of your very own! Deadline to post is next Monday the 16th.
Stay tuned next Wednesday for another ilovetocreate.com column (and of course every day for my regularly scheduled blog and Twitter updates. Until then, don’t forget to love one another.
Happy V-Day!
xo,
Vickie
P.S. Help spread the love, by linking to this project on your Twitter, Myspace, Facebook & blog pages. Thank you!


