
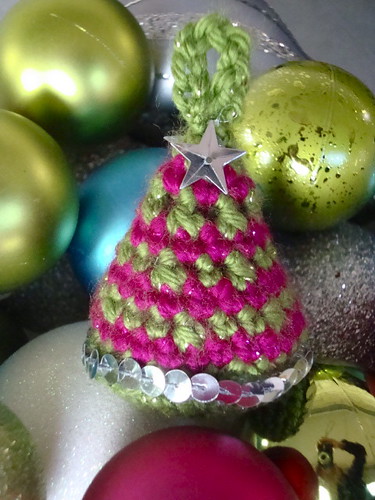
NEW PATTERN: Amigurum-tree Ornament!
Materials
Simply Soft Party, in colors: Spring Sparkle(MC) & Fuchsia Sparkle (CC)
Tapestry Needle
Sequin or Beads
Hot Glue Gun or Needle & Thread
Finished Size
2″ Tall (excluding loop)
Special Abbreviation
sc2tog= single crochet two stitches together
Directions
Tree Body:
Using MC, ch 24. Sl st in 1st ch to join rnd, taking care not to twist.
Rnd 1: Ch1, sc in next ch and all the way around. Join with a sl st. (23)
Rnd 2: Join CC. Repeat Rnd 1.
Rnd 3: With MC, ch1, sc2tog, *2sc, sc2tog; repeat from * to last st, sc. Join with a sl st. (18)
Rnd 4: With CC, repeat Rnd 1.
Rnd 5: With MC, ch1, *sc2tog, sc; repeat from * to end. Join with a sl st. (13)
Rnd 6: With CC, repeat Rnd 1.
Rnd 7: With MC, ch1, *sc2tog; repeat from * to end. Join with a sl st. (7)
Rnd 8: With CC, repeat Rnd 1.
Rnd 9: With MC, repeat, Rnd 7. (3) DO NOT TIE OFF.
Hanging Loop:
Ch 8; tie off. Fold chain in half to form loop; use tapestry to push tail through to underside; knot in place.
Tree Base:
Using MC and magic loop method, 6sc in center of loop. Pull tight to close loop. Join rnd with a sl st.
Rnd 1: Ch1, sc in base of ch, 2sc in every sc around. Join with a sl st. (12)
Rnd 2: Ch1, 2sc, *sc, 2sc; repeat from * around. Join with a sl st. (18)
Rnd 3: Ch1, 2sc, *sc [twice], 2sc; rep from to last st, sc. Join with a sl st. (24)
Tie off, leaving 6″ tail.
Finishing
Stuff remaining tail ends from tree body, inside of it. Stuff with additional yarn scraps until tree feels firm.
Sew tree base onto tree body, using tail & tapestry needle.
Embellish by hot glueing or sewing sequin to the tree. Hang & enjoy!
Happy Holidays!
Stitch.Rock.Love,
Vickie
Pattern for non-commercial use only. Copyright Craft.Rock.Love Media, LLC 2010. All rights reserved.


What a great Idea thanks for sharing Vickie 🙂
Thanks for the pattern! What a great lil stashbuster! I linked to your pattern on my blog -thanks for sharing!
really cute trees.
easy to make but fabulous.
thanks for the pattern. i’m linking.
doro.
I just have to tell you the “tweeks” I did for this pattern.
In the plain sc rounds I added red yarn and made an sc every so many sts to simulate ornaments.
Then, I made a small star (Magic circle, ch 3, sc in 2nd ch, hdc in 3rd, sl st in ring & repeat 4 more times, sl st to base of ch 3) and attached it to the top.
As soon as I get it stuffed I will post a pix onmy blog and add it to my Ravelry projects. I am making it for a cat-nip toy, so I will also add a bell and some catnip with the stuffing.
I do believe this is the BEST tree pattern I have tried.
I just found this little treasure tucked away in my inbox and can’t wait to get started on a batch of cute little trees for next year’s holidays. They’re going to look adorable on my Christmas tree and as package tie-ons for friends and family. Thanks! 🙂